top of page

It's important to keep in mind that a set of files cut from a folder on a Windows network which have rights to one matter (or user group) which are then CUT and pasted to a folder for a different client/matter (and other users) will inherit the rights of the origin folders. Users who only have rights to the destination folder will not be able to access the files.


In order to get around this problem, you can copy the files into another folder in the directory with the same rights as the intended destination folder; delete the files in the intended destination folder; and then copy the files back into the intended destination folder. If you don't delete the files in the intended destination folder, and instead overwrite them when copying back in, the rights will not get updated.


So if files are saved here:

F:\A0100\0002\Johnson Exhibits


. . . .and are then CUT and pasted here:


F:\C0200\0004\Johnson Exhibits


If you check the Properties for F:\C0200\0004\Johnson Exhibits on the Security tab, you should see this:


Note the difference between the client matter name (C0200.0004) used in the object name, and that for the Group with rights, A0100.0002. Obviously, there's a problem. The solution is to do the following:


COPY: F:\C0200\0004\Johnson Exhibits TO: F:\C0200\0004\GeneralFolder

DELETE CONTENTS OF: F:\C0200\0004\Johnson Exhibits

COPY F:\C0200\0004\GeneralFolder TO F:\C0200\0004\Johnson Exhibits


But what if you're worried there may be additional files in a directory with the wrong rights assigned to them? How can you check the rights of all of the files in a directory?


This PowerShell script will generate a list of the rights for all files in the directory that you specify:


Get-ChildItem -Path "C:\Your\Directory" -Recurse | Get-Acl | Select-Object Path, Owner, AccessToString


However, if you run this script you may get an error message:


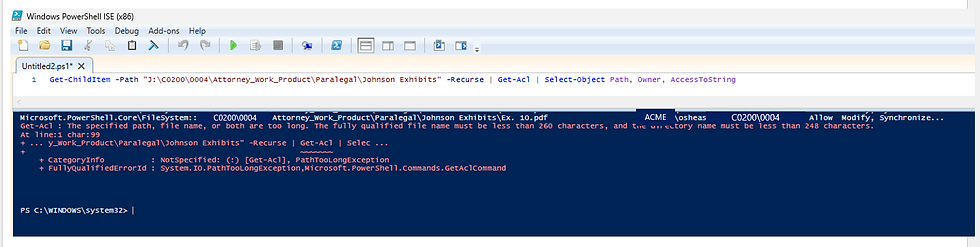
This comes up when there are filepaths longer than 255 - 260 characters - the Windows Explorer limit.


So, before you run the script to get a list of the rights for a directory, you want to run this script to search for any files with a path of 260 characters or longer.


Get-ChildItem -Path "C:\Your\Directory" -Recurse -Force -ErrorAction SilentlyContinue | Where-Object {$_.FullName.Length -gt 260} | Select-Object FullName


Rename those filepaths, and then run the script to find the rights of all files in a folder:


You can then copy the results into Excel and filter for matter numbers other than those which files in the directory should have. Just be sure to filter so that you're only excluding the permissions listed on the right, and not the file paths on the left. So in this example, filter for Does Not Contain 'cg_F:\C0200\0004', not just 'F:\C0200\0004'.


In Windows 11, in Windows Explorer when you right click on a file and select 'Properties', you'll see that you have the option to 'Remove Properties and Personal information'.


This function can be a quick and easy way to remove some, if not all, metadata from a file. Click on the underlined, blue link and you will be given the option to create a copy with 'all possible properties' removed, or only certain properties that you select from the current file:


. . . . the function will remove the Author and reset the date created, modified, and accessed in the 'File' section, but leaves in the original dates and times in the origin section.


It may be better than nothing but it will not remove comments and track changes from a Word document even if they are hidden.


To remove the metadata from any individual MS Office file you would go to File . . . Info . . . Inspect for Issues . . . Inspect Document, and you'll get the option to run Document Inspector.


The document inspector will flag what kinds of metadata are present.


The Protect function in Adobe Acrobat includes an option to remove hidden information.


If you have a flash drive or disc from which you want to access a program when booting up in BIOS, the data can be saved in an .iso file - which acts as a virtual drive. The .iso image file holds the data in binary format. However you cannot download an .iso file and simply copy it to a flash drive, the standard way in Windows Explorer. To save an .iso file to a flash drive, use a free utility named Rufus, which is available here. Use the portable, or standalone version, which does not need to be installed:


[FWIW, I scanned it using Bitdefender and it was clean.] Rufus will run from the downloaded executable file and give you the option to select which flash drive you want to add an .iso image to


Rufus may take 15 minutes or more to copy an .iso file to flash drive. I used it to add the .iso file for Hiren's BootCD PE to the flash drive - it downloads from the site as a single file, 'HBCD_PE_x64.iso'. [Hiren's includes several data recovery tools, and I needed to use it to check if the drive of an old laptop I was decommissioning had been successfully wiped.].


It will take Rufus longer than an hour to add a 3 GB file to a flash drive.


When the Hiren Boot .iso file is added, you will see multiple files and folders.

I inserted the flash drive into the laptop that I wiped, and pressed F12 [the laptop was a Toshiba - other hardware may require another function key] to enter BIOS - the firmware. The flash drive was recognized:

. . . .Hiren's BootCD PE successfully ran:


Sean O'Shea has more than 20 years of experience in the litigation support field with major law firms in New York and San Francisco.   He is an ACEDS Certified eDiscovery Specialist and a Relativity Certified Administrator.

The views expressed in this blog are those of the owner and do not reflect the views or opinions of the owner’s employer.

If you have a question or comment about this blog, please make a submission using the form to the right. 

Your details were sent successfully!

© 2015 by Sean O'Shea . Proudly created with Wix.com

bottom of page